Amiga 500: 512KB to 1MB internal RAM upgrade
By default the Amiga A500 only has 512kB of RAM fitted. This prevents you from running some games, like Gobliins 2: The Prince Buffoon. From the Wikipedia article on the Amiga 500:
The stock 512 KB Chip RAM can be complemented by 512 KB using a “trapdoor” expansion (Commodore A501 or compatible).[1] While that expansion memory is connected to the chip bus, hardware limitations of the stock Agnus chip prevent its use as Chip RAM, only the CPU can access it. Suffering from the same contention limitations as Chip RAM, that memory is known as “Slow RAM” or “Pseudo-fast RAM”. Retrofitting a later ECS Agnus and changing the memory-layout jumper allows use of trapdoor RAM as real Chip RAM for a total 1 MB.
Step 1: Check if your A500 PCB supports RAM upgrade
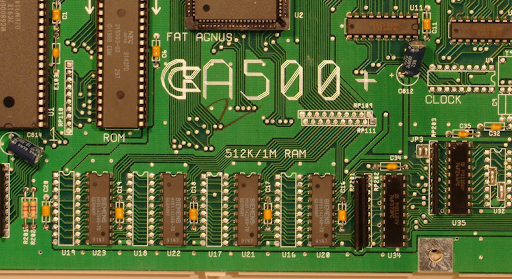
Some Amiga 500 revisions have room to expand the internal Chip RAM to 1MB, up from the original 512KB. My REV6A PCB has this option.
You can see the empty RAM slots here:
Step 2. Acquire the right RAM chips
I’ve found some cheap Siemens HYB514256B-70 chips. The original ones on the motherboard are HYB514256b-60 (little bit faster, but not required for the A500).
Another compatible chip is the TI TMS44C256-10N.
You will need 4 of these chips.

Step 3. Solder the RAM chips (or the sockets)
Once you have the RAM chips, you can either solder them directly on the motherboard, or solder sockets and fit the RAM chips in the sockets (like I did).
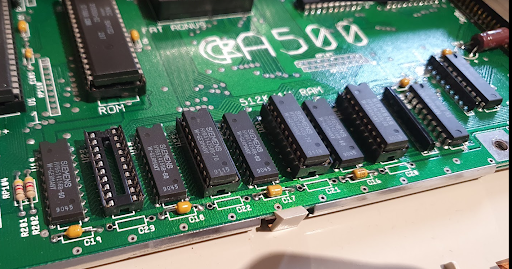
You can see 3 out of 4 sockets have the new RAM chip populated. Optionally power up the Amiga right now. Your new RAM won’t be recognized yet, but the Amiga should boot, and the RAM chips should not get hot. If they do, they are broken or something went wrong went mounting them.
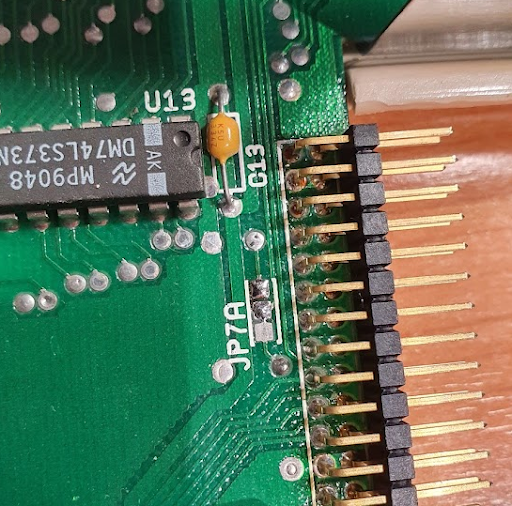
Step 4. Test as SLOW RAM
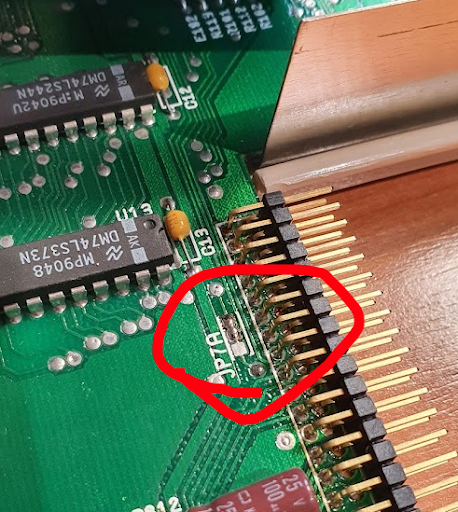
Find JP7A. It will be connecting pads 1-2 pads or none.
Put a solder blob on pin 2-3, like in the picture.
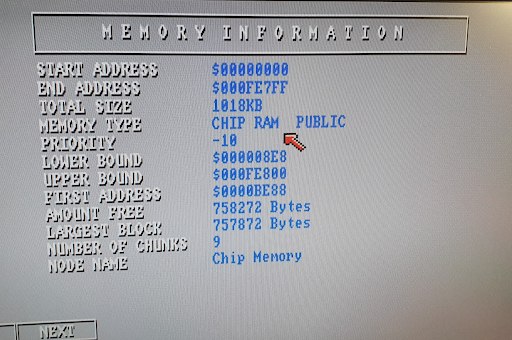
Boot up SysInfo, and check that you now have 512kB Chip RAM and 512kB other RAM / SLOW RAM.
Step 5. Configure as CHIP RAM
Undo your JP7A modification: pin 2-3 should be open again, like in the picture.
Now find JP2 (it’s to the right of the Motorola 68K CPU, the biggest chip on the motherboard). On JP2:
- Open connection 1-2; I used an Exacto Knife, be careful not to cut any other traces!
- Shorten pins 2-3; I used a solder blob again.
It should look like this:

Step 6. Enjoy 1MB CHIP RAM
Now boot up your Amiga again, and load SysInfo, Workbench or something else. You should now have 1MB of Chip RAM!