<?xml version="1.0" encoding="utf-8"?><feed xmlns="http://www.w3.org/2005/Atom" ><generator uri="https://jekyllrb.com/" version="3.10.0">Jekyll</generator><link href="http://www.veemax.be/feed.xml" rel="self" type="application/atom+xml" /><link href="http://www.veemax.be/" rel="alternate" type="text/html" /><updated>2024-08-07T10:40:18+02:00</updated><id>http://www.veemax.be/feed.xml</id><title type="html">VeeMax</title><subtitle>VeeMax is Maxime Vincent&apos;s embedded hardware consulting company.</subtitle><author><name>Maxime Vincent</name></author><entry><title type="html">UVC webcam support for Synology NAS</title><link href="http://www.veemax.be/blog/Synology-UVC-camera-modules/" rel="alternate" type="text/html" title="UVC webcam support for Synology NAS" /><published>2023-03-02T00:00:00+01:00</published><updated>2023-03-02T00:00:00+01:00</updated><id>http://www.veemax.be/blog/Synology-UVC-camera-modules</id><content type="html" xml:base="http://www.veemax.be/blog/Synology-UVC-camera-modules/"><![CDATA[<h2 id="uvc-camera-not-recognized">UVC camera not recognized</h2>

<p>On my Intel Apollolake Synology (DS718+), my Logitech C270 UVC webcam did not load, when plugging it into USB.
Turns out UVC support is not built into the default Synology kernel.</p>

<h2 id="get-synology-kernel-sources-and-toolchain">Get Synology kernel sources and toolchain</h2>
<ul>
  <li>Synology archive: <a href="https://archive.synology.com/download/">https://archive.synology.com/download/</a></li>
  <li>Synology Linux-4.4.x fork for Apollolake: <a href="https://global.synologydownload.com/download/ToolChain/Synology%20NAS%20GPL%20Source/7.0-41890/apollolake/linux-4.4.x.txz">https://global.synologydownload.com/download/ToolChain/Synology%20NAS%20GPL%20Source/7.0-41890/apollolake/linux-4.4.x.txz</a></li>
  <li>Synology GCC 12 toolchain for Apollolake: <a href="https://global.synologydownload.com/download/ToolChain/toolchain/7.2-63134/Intel%20x86%20Linux%204.4.302%20%28Apollolake%29/apollolake-gcc1220_glibc236_x86_64-GPL.txz">https://global.synologydownload.com/download/ToolChain/toolchain/7.2-63134/Intel%20x86%20Linux%204.4.302%20%28Apollolake%29/apollolake-gcc1220_glibc236_x86_64-GPL.txz</a></li>
</ul>

<h2 id="setup-cross-compiler">Setup cross compiler</h2>

<ul>
  <li>Extract the GCC toolchain and <code class="language-plaintext highlighter-rouge">cd</code> to whereever you have it extracted</li>
  <li>Then:
    <div class="language-sh highlighter-rouge"><div class="highlight"><pre class="highlight"><code><span class="nb">export </span><span class="nv">CC</span><span class="o">=</span><span class="sb">`</span><span class="nb">pwd</span><span class="sb">`</span>/x86_64-pc-linux-gnu/bin/x86_64-pc-linux-gnu-gcc
<span class="nb">export </span><span class="nv">LD</span><span class="o">=</span><span class="sb">`</span><span class="nb">pwd</span><span class="sb">`</span>/x86_64-pc-linux-gnu/bin/x86_64-pc-linux-gnu-ld
<span class="nb">export </span><span class="nv">RANLIB</span><span class="o">=</span><span class="sb">`</span><span class="nb">pwd</span><span class="sb">`</span>/x86_64-pc-linux-gnu/bin/x86_64-pc-linux-gnu-ranlib
<span class="nb">export </span><span class="nv">CFLAGS</span><span class="o">=</span><span class="nt">-I</span><span class="sb">`</span><span class="nb">pwd</span><span class="sb">`</span>/x86_64-pc-linux-gnu/include
<span class="nb">export </span><span class="nv">LDFLAGS</span><span class="o">=</span><span class="nt">-L</span><span class="sb">`</span><span class="nb">pwd</span><span class="sb">`</span>/x86_64-pc-linux-gnu/lib
<span class="nb">export </span><span class="nv">CXX</span><span class="o">=</span><span class="sb">`</span><span class="nb">pwd</span><span class="sb">`</span>/x86_64-pc-linux-gnu/bin/x86_64-pc-linux-gnu-g++
<span class="nb">export </span><span class="nv">AR</span><span class="o">=</span><span class="sb">`</span><span class="nb">pwd</span><span class="sb">`</span>/x86_64-pc-linux-gnu/bin/x86_64-pc-linux-gnu-ar
<span class="nb">export </span><span class="nv">NM</span><span class="o">=</span><span class="sb">`</span><span class="nb">pwd</span><span class="sb">`</span>/x86_64-pc-linux-gnu/bin/x86_64-pc-linux-gnu-nm
<span class="nb">export </span><span class="nv">STRIP</span><span class="o">=</span><span class="sb">`</span><span class="nb">pwd</span><span class="sb">`</span>/x86_64-pc-linux-gnu/bin/x86_64-pc-linux-gnu-strip
  
<span class="nb">export </span><span class="nv">PATH</span><span class="o">=</span><span class="sb">`</span><span class="nb">pwd</span><span class="sb">`</span>/x86_64-pc-linux-gnu/bin/:<span class="nv">$PATH</span>
</code></pre></div>    </div>
  </li>
</ul>

<h2 id="linux-menuconfig">Linux menuconfig</h2>

<ul>
  <li>Extract the Linux 4.4.x kernel sources and <code class="language-plaintext highlighter-rouge">cd</code> into that directory.</li>
  <li>Modify the the default apollolake config at <code class="language-plaintext highlighter-rouge">synoconfigs/apollolake</code>, and add:
    <pre><code class="language-Kconfig">CONFIG_VIDEO_V4L2=m
CONFIG_CONFIG_MEDIA_CAMERA_SUPPORT=y
CONFIG_USB_VIDEO_CLASS=m
CONFIG_LOCALVERSION="+"
</code></pre>
  </li>
</ul>

<p>That last LOCALVERSION setting is needed to allow the module to load on DSM7.1 versions.</p>

<h2 id="compile-kernel-modules">Compile kernel modules</h2>
<p>You’re ready to compile the kernel modules now.</p>
<ul>
  <li>Run: <code class="language-plaintext highlighter-rouge">CROSS_COMPILE=x86_64-pc-linux-gnu- make modules -j20</code>
This will build all kernel modules using 20 parallel processes.</li>
</ul>

<h2 id="copy-over-the-required-kernel-modules-to-the-synology">Copy over the required kernel modules to the Synology</h2>

<p>Once done, copy over the required kernel modules to the Synology (using ssh or the file browser or …)</p>

<p>You’ll need:
<code class="language-plaintext highlighter-rouge">videobuf2-memops.ko</code> <code class="language-plaintext highlighter-rouge">videobuf2-vmalloc.ko</code> <code class="language-plaintext highlighter-rouge">videobuf2-core.ko</code> <code class="language-plaintext highlighter-rouge">videobuf2-v4l2.ko</code> <code class="language-plaintext highlighter-rouge">videodev.ko</code> <code class="language-plaintext highlighter-rouge">v4l2-common.ko</code> and <code class="language-plaintext highlighter-rouge">uvcvideo.ko</code></p>

<h2 id="load-the-modules-on-the-running-linux-kernel">Load the modules on the running Linux kernel</h2>

<ul>
  <li>ssh into your Synology server</li>
  <li>cd to wherever you copied the kernel modules on your Synology</li>
  <li>Then run:
    <div class="language-sh highlighter-rouge"><div class="highlight"><pre class="highlight"><code>insmod videobuf2-memops.ko
insmod videobuf2-vmalloc.ko
insmod videobuf2-core.ko
insmod videobuf2-v4l2.ko
insmod videodev.ko
insmod v4l2-common.ko
insmod uvcvideo.ko
</code></pre></div>    </div>
  </li>
  <li>Check if the modules loaded correctly, using <code class="language-plaintext highlighter-rouge">dmesg</code>. Look for <code class="language-plaintext highlighter-rouge">Linux video capture interface: v2.00</code>.</li>
</ul>

<h2 id="plug-in-a-uvc-webcam">Plug in a UVC webcam</h2>
<p>Now plug in a UVC webcam, and check if it’s detected using <code class="language-plaintext highlighter-rouge">dmesg</code>. E.g.:</p>
<div class="language-plaintext highlighter-rouge"><div class="highlight"><pre class="highlight"><code>  [1839456.436728] uvcvideo: Found UVC 1.00 device USBDevice (046d:0825)
  [1839456.534937] input: USBDevice as /devices/pci0000:00/0000:00:13.1/0000:02:00.0/usb3/3-2/3-2.1/3-2.1:1.0/input/input2
  [1839456.546939] usbcore: registered new interface driver uvcvideo
</code></pre></div></div>

<h2 id="enjoy">Enjoy</h2>

<p>Happy camming!</p>]]></content><author><name>Maxime Vincent</name></author><category term="Blog" /><category term="synology" /><category term="linux" /><category term="kernel" /><category term="uvc" /><category term="webcam" /><category term="camera" /><summary type="html"><![CDATA[UVC camera not recognized]]></summary></entry><entry><title type="html">MCUboot image parser in Rust</title><link href="http://www.veemax.be/blog/mcuboot-img-parser/" rel="alternate" type="text/html" title="MCUboot image parser in Rust" /><published>2022-01-10T00:00:00+01:00</published><updated>2022-01-10T00:00:00+01:00</updated><id>http://www.veemax.be/blog/mcuboot-img-parser</id><content type="html" xml:base="http://www.veemax.be/blog/mcuboot-img-parser/"><![CDATA[<p>I’ve been enjoying working with the MCUboot bootloader, which is natively supported on the Zephyr RTOS.
For the maximum security, I like to used signed + encrypted firmware upgrade images.
This ensures that:</p>
<ul>
  <li>Only images signed by the person or company owning the private signing key can be flashed your embedded target</li>
  <li>Images can be publicly distributed, without exposing the plain firmware binary, as they are encrypted.</li>
</ul>

<p>MCUboot supports different types of keys and ciphers: e.g. <code class="language-plaintext highlighter-rouge">rsa-2048</code>, <code class="language-plaintext highlighter-rouge">rsa-3072</code>, <code class="language-plaintext highlighter-rouge">ecdsa-p256</code>, <code class="language-plaintext highlighter-rouge">ecdsa-p224</code> or <code class="language-plaintext highlighter-rouge">ed25519</code>.
Read about signing images with <code class="language-plaintext highlighter-rouge">imgtool</code> here: <a href="https://docs.mcuboot.com/imgtool.html">https://docs.mcuboot.com/imgtool.html</a>. <br />
And see <a href="https://docs.mcuboot.com/encrypted_images.html">https://docs.mcuboot.com/encrypted_images.html</a> for more information about encrypted images.</p>

<p><code class="language-plaintext highlighter-rouge">imgtool.py</code> allows you to easily generate those keys, create C-headers from existing keys, etc…
One thing I felt that was lacking, was an easy way to “look into” a binary MCUboot image, and see which type of signing and encryption it was using.
This basically comes down to parsing the TLV structs embedded in the firmware images generated by Zephyr / MCUboot.</p>

<p>Because of this (and because I wanted to write some code in Rust again), I decided to create <code class="language-plaintext highlighter-rouge">mcuboot-img-parser</code>, which does exactly that.
E.g.</p>
<div class="language-plaintext highlighter-rouge"><div class="highlight"><pre class="highlight"><code>$ ./target/release/mcuboot-img-parser build/zephyr/zephyr.signed.bin
mcuboot-tlv-parser v0.0.1
-------------------------
[*] Opening image file build/zephyr/zephyr.signed.bin, total file size:  17202
[*] Offset: 00000000, 0x00000000: ImageHeader { magic: 2532554813, load_addr: 0, hdr_size: 512, prot_tlv_size: 0, img_size: 16480, flags: 0, ver_major: 0, ver_minor: 0, ver_rev: 0, ver_build: 0, pad1: 0 }
[*] Offset: 00000512, 0x00000200: ImageHeader padding 480 bytes: [0, 0, 0, 0, 0, 0, 0, 0] ...
[*] Offset: 00000512, 0x00000200: BinaryImage 16480 bytes: [68, 7, 0, 20, 75, d7, 0, 0] ...
[*] Offset: 00016992, 0x00004260: ImageTLVInfo { magic: 26887, tlv_tot: 210 }
[*] Offset: 00016996, 0x00004264: TLV_SHA256, 32 bytes: [c, 4d, 34, 42, 55, 96, 5, 0] ...
[*] Offset: 00017032, 0x00004288: TLV_PUBKEY, 91 bytes: [30, 59, 30, 13, 6, 7, 2a, 86] ...
[*] Offset: 00017127, 0x000042e7: TLV_ECDSA256, 71 bytes: [30, 45, 2, 21, 0, 98, b6, 89] ...
</code></pre></div></div>

<p>You can see the <code class="language-plaintext highlighter-rouge">TLV_ECDSA256</code> tag, which indicates that this image is using an ECDSA256 pubkey to verify the signature of the image.
Additionally, you can see that the pubkey is embedded in this image (which is not the default), because of the presence of the <code class="language-plaintext highlighter-rouge">TLV_PUBKEY</code> tag.
This can be achieved by using the <code class="language-plaintext highlighter-rouge">--public-key-format full</code> parameter when calling <code class="language-plaintext highlighter-rouge">imgtool</code>.</p>

<p>The <code class="language-plaintext highlighter-rouge">mcuboot-img-parser</code> output for an image using signing AND encrytion, would look like this:</p>
<div class="language-plaintext highlighter-rouge"><div class="highlight"><pre class="highlight"><code>$ ./target/release/mcuboot-img-parser build/zephyr/zephyr.signed.encrypted.bin
mcuboot-tlv-parser v0.0.1
-------------------------
[*] Opening image file build/zephyr/zephyr.signed.encrypted.bin, total file size:  150599
[*] Offset: 00000000, 0x00000000: ImageHeader { magic: 2532554813, load_addr: 0, hdr_size: 512, prot_tlv_size: 0, img_size: 149760, flags: 4, ver_major: 1, ver_minor: 2, ver_rev: 0, ver_build: 0, pad1: 0 }
                                : TLV Flag: ENCRYPTED_AES128
[*] Offset: 00000512, 0x00000200: ImageHeader padding 480 bytes: [0, 0, 0, 0, 0, 0, 0, 0] ...
[*] Offset: 00000512, 0x00000200: BinaryImage 149760 bytes: [94, 94, 84, cc, 3, a2, d7, 28] ...
[*] Offset: 00150272, 0x00024b00: ImageTLVInfo { magic: 26887, tlv_tot: 327 }
[*] Offset: 00150276, 0x00024b04: TLV_SHA256, 32 bytes: [3e, d2, 63, 38, 14, 58, 45, 27] ...
[*] Offset: 00150312, 0x00024b28: TLV_PUBKEY, 91 bytes: [30, 59, 30, 13, 6, 7, 2a, 86] ...
[*] Offset: 00150407, 0x00024b87: TLV_ECDSA256, 71 bytes: [30, 45, 2, 21, 0, 82, 75, b0] ...
[*] Offset: 00150482, 0x00024bd2: TLV_ENC_EC256, 113 bytes: [4, 97, f5, 14, 92, 8d, 43, 39] ...
</code></pre></div></div>
<p>You can see the TLV Flag <code class="language-plaintext highlighter-rouge">ENCRYPTED_AES128</code> in the ImageHeader and the additional <code class="language-plaintext highlighter-rouge">TLV_ENC_EC256</code> TLV in this this image.</p>

<p>You can find the code here: <a href="https://github.com/maximevince/mcuboot-img-parser">https://github.com/maximevince/mcuboot-img-parser</a></p>]]></content><author><name>Maxime Vincent</name></author><category term="Blog" /><category term="firmware" /><category term="embedded" /><category term="rust" /><category term="mcuboot" /><category term="bootloader" /><category term="zephyr" /><category term="security" /><category term="encryption" /><summary type="html"><![CDATA[I’ve been enjoying working with the MCUboot bootloader, which is natively supported on the Zephyr RTOS. For the maximum security, I like to used signed + encrypted firmware upgrade images. This ensures that: Only images signed by the person or company owning the private signing key can be flashed your embedded target Images can be publicly distributed, without exposing the plain firmware binary, as they are encrypted.]]></summary></entry><entry><title type="html">Amiga 500: 512KB to 1MB internal RAM upgrade</title><link href="http://www.veemax.be/blog/amiga-500-ram-upgrade/" rel="alternate" type="text/html" title="Amiga 500: 512KB to 1MB internal RAM upgrade" /><published>2021-08-28T00:00:00+02:00</published><updated>2021-08-28T00:00:00+02:00</updated><id>http://www.veemax.be/blog/amiga-500-ram-upgrade</id><content type="html" xml:base="http://www.veemax.be/blog/amiga-500-ram-upgrade/"><![CDATA[<p>By default the Amiga A500 only has 512kB of RAM fitted. This prevents you from running some games, like Gobliins 2: The Prince Buffoon.
From the <a href="https://en.wikipedia.org/wiki/Amiga_500#Memory">Wikipedia article</a> on the Amiga 500:</p>
<blockquote>
  <p>The stock 512 KB Chip RAM can be complemented by 512 KB using a “trapdoor” expansion (Commodore A501 or compatible).[1] While that expansion memory is connected to the chip bus, hardware limitations of the stock Agnus chip prevent its use as Chip RAM, only the CPU can access it. Suffering from the same contention limitations as Chip RAM, that memory is known as “Slow RAM” or “Pseudo-fast RAM”. Retrofitting a later ECS Agnus and changing the memory-layout jumper allows use of trapdoor RAM as real Chip RAM for a total 1 MB.</p>
</blockquote>

<h2 id="step-1-check-if-your-a500-pcb-supports-ram-upgrade">Step 1: Check if your A500 PCB supports RAM upgrade</h2>
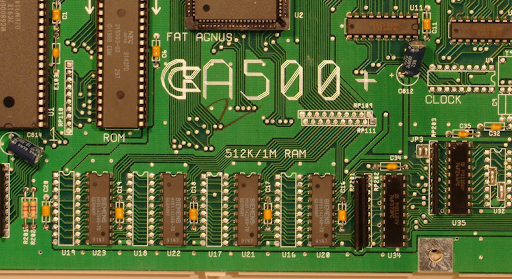
<p>Some Amiga 500 revisions have room to expand the internal Chip RAM to 1MB, up from the original 512KB. My REV6A PCB has this option.</p>

<p>You can see the empty RAM slots here:
<a href="/assets/images/a500/a500_1.png"><img src="/assets/images/a500/a500_1.png" alt="/assets/images/a500/a500_1.png" /></a></p>

<h2 id="step-2-acquire-the-right-ram-chips">Step 2. Acquire the right RAM chips</h2>
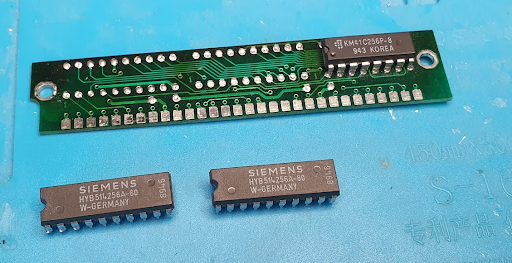
<p>I’ve found some cheap Siemens HYB514256B-70 chips. The original ones on the motherboard are HYB514256b-60 (little bit faster, but not required for the A500).</p>

<p>Another compatible chip is the TI TMS44C256-10N.</p>

<p>You will need 4 of these chips.
<a href="/assets/images/a500/a500_2.png"><img src="/assets/images/a500/a500_2.png" alt="/assets/images/a500/a500_2.png" /></a></p>

<h2 id="step-3-solder-the-ram-chips-or-the-sockets">Step 3. Solder the RAM chips (or the sockets)</h2>
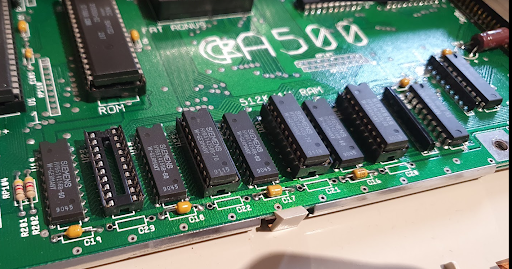
<p>Once you have the RAM chips, you can either solder them directly on the motherboard, or solder sockets and fit the RAM chips in the sockets (like I did).
<a href="/assets/images/a500/a500_3.png"><img src="/assets/images/a500/a500_3.png" alt="/assets/images/a500/a500_3.png" /></a></p>

<p>You can see 3 out of 4 sockets have the new RAM chip populated.
Optionally power up the Amiga right now. Your new RAM won’t be recognized yet, but the Amiga should boot, and the RAM chips should not get hot. If they do, they are broken or something went wrong went mounting them.</p>

<h2 id="step-4-test-as-slow-ram">Step 4. Test as SLOW RAM</h2>
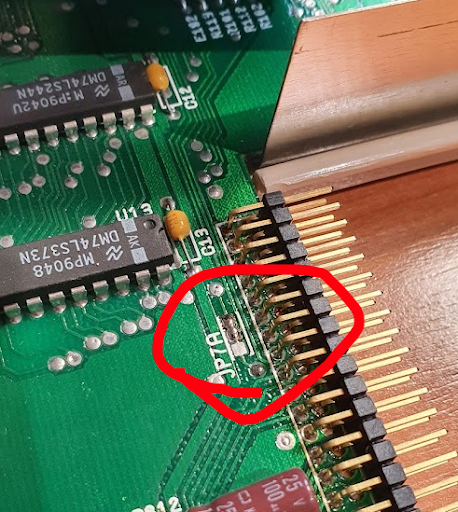
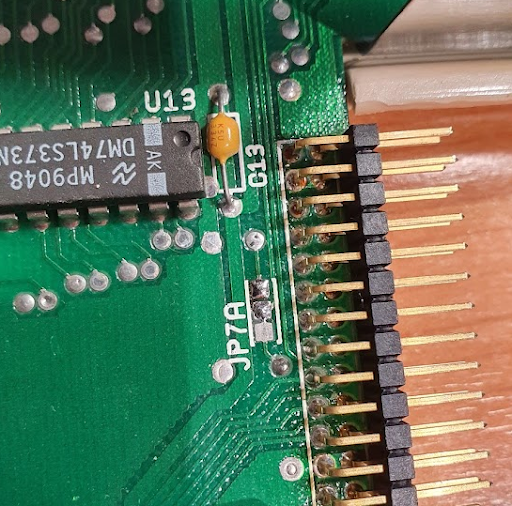
<p>Find JP7A. It will be connecting pads 1-2 pads or none.
Put a solder blob on pin 2-3, like in the picture.
<a href="/assets/images/a500/a500_4.png"><img src="/assets/images/a500/a500_4.png" alt="/assets/images/a500/a500_4.png" /></a></p>

<p>Boot up SysInfo, and check that you now have 512kB Chip RAM and 512kB other RAM / SLOW RAM.</p>

<h2 id="step-5-configure-as-chip-ram">Step 5. Configure as CHIP RAM</h2>
<p>Undo your JP7A modification: pin 2-3 should be open again, like in the picture.</p>

<p><a href="/assets/images/a500/a500_5.png"><img src="/assets/images/a500/a500_5.png" alt="/assets/images/a500/a500_5.png" /></a></p>

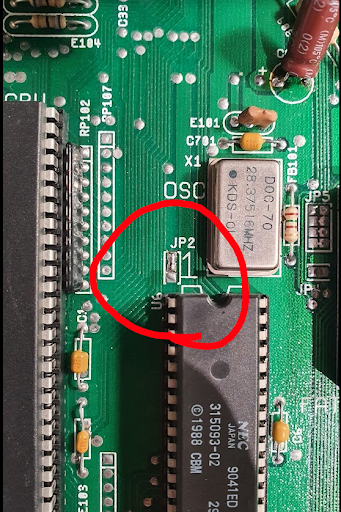
<p>Now find JP2 (it’s to the right of the Motorola 68K CPU, the biggest chip on the motherboard).
On JP2:</p>

<ul>
  <li>Open connection 1-2; I used an Exacto Knife, be careful not to cut any other traces!</li>
  <li>Shorten pins 2-3; I used a solder blob again.
It should look like this:
<a href="/assets/images/a500/a500_6.png"><img src="/assets/images/a500/a500_6.png" alt="/assets/images/a500/a500_6.png" /></a></li>
</ul>

<h2 id="step-6-enjoy-1mb-chip-ram">Step 6. Enjoy 1MB CHIP RAM</h2>
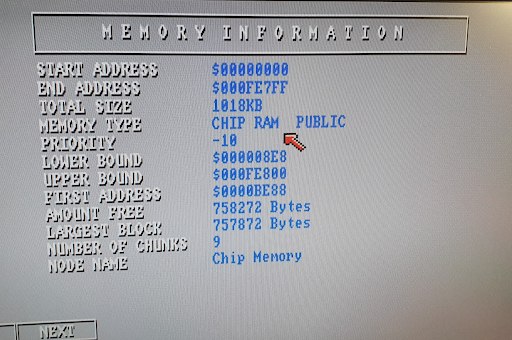
<p>Now boot up your Amiga again, and load SysInfo, Workbench or something else. You should now have 1MB of Chip RAM!
<a href="/assets/images/a500/a500_7.png"><img src="/assets/images/a500/a500_7.png" alt="/assets/images/a500/a500_7.png" /></a></p>]]></content><author><name>Maxime Vincent</name></author><category term="Blog" /><category term="amiga" /><category term="projects" /><category term="hardware" /><category term="soldering" /><summary type="html"><![CDATA[By default the Amiga A500 only has 512kB of RAM fitted. This prevents you from running some games, like Gobliins 2: The Prince Buffoon. From the Wikipedia article on the Amiga 500: The stock 512 KB Chip RAM can be complemented by 512 KB using a “trapdoor” expansion (Commodore A501 or compatible).[1] While that expansion memory is connected to the chip bus, hardware limitations of the stock Agnus chip prevent its use as Chip RAM, only the CPU can access it. Suffering from the same contention limitations as Chip RAM, that memory is known as “Slow RAM” or “Pseudo-fast RAM”. Retrofitting a later ECS Agnus and changing the memory-layout jumper allows use of trapdoor RAM as real Chip RAM for a total 1 MB.]]></summary></entry><entry><title type="html">GDB debugging with Zephyr RTOS support</title><link href="http://www.veemax.be/blog/GDB-debugging-with-Zephyr-RTOS-support/" rel="alternate" type="text/html" title="GDB debugging with Zephyr RTOS support" /><published>2021-06-21T00:00:00+02:00</published><updated>2021-06-21T00:00:00+02:00</updated><id>http://www.veemax.be/blog/GDB-debugging-with-Zephyr-RTOS-support</id><content type="html" xml:base="http://www.veemax.be/blog/GDB-debugging-with-Zephyr-RTOS-support/"><![CDATA[<ul>
  <li>Build Zephyr project with <code class="language-plaintext highlighter-rouge">DEBUG_THREAD_INFO</code> (2.6.x) or <code class="language-plaintext highlighter-rouge">OPENOCD_SUPPORT</code> (2.5.x and lower)</li>
  <li>Use (or build) an openocd version that supports Zephyr RTOS <a href="https://github.com/zephyrproject-rtos/openocd">https://github.com/zephyrproject-rtos/openocd</a>.
On Arch Linux you can use https://aur.archlinux.org/packages/openocd-zephyr-git</li>
  <li>Configure your openocd to look for Zephyr symbols:
<code class="language-plaintext highlighter-rouge">openocd-zephyr -f openocd.cfg -c "nrf52.cpu configure -rtos Zephyr"</code></li>
  <li>Run gdb, and let it connect to openocd:
<code class="language-plaintext highlighter-rouge">arm-none-eabi-gdb build/zephyr/zephyr.elf -ex 'target remote :3333'</code></li>
  <li>Et voila:
<a href="/assets/images/zephyr_gdb.png"><img src="/assets/images/zephyr_gdb.png" alt="GDB with Zephyr support" /></a></li>
</ul>]]></content><author><name>Maxime Vincent</name></author><category term="Blog" /><category term="jtag" /><category term="swd" /><category term="gdb" /><category term="zephyr" /><category term="debugging" /><summary type="html"><![CDATA[Build Zephyr project with DEBUG_THREAD_INFO (2.6.x) or OPENOCD_SUPPORT (2.5.x and lower) Use (or build) an openocd version that supports Zephyr RTOS https://github.com/zephyrproject-rtos/openocd. On Arch Linux you can use https://aur.archlinux.org/packages/openocd-zephyr-git Configure your openocd to look for Zephyr symbols: openocd-zephyr -f openocd.cfg -c "nrf52.cpu configure -rtos Zephyr" Run gdb, and let it connect to openocd: arm-none-eabi-gdb build/zephyr/zephyr.elf -ex 'target remote :3333' Et voila:]]></summary></entry><entry><title type="html">RPi4: Using the PiMoroni Fan Shim on LibreElec including the LEDs!</title><link href="http://www.veemax.be/blog/pimoroni-fan-shim-on-libreelec/" rel="alternate" type="text/html" title="RPi4: Using the PiMoroni Fan Shim on LibreElec including the LEDs!" /><published>2019-08-06T00:00:00+02:00</published><updated>2019-08-06T00:00:00+02:00</updated><id>http://www.veemax.be/blog/pimoroni-fan-shim-on-libreelec</id><content type="html" xml:base="http://www.veemax.be/blog/pimoroni-fan-shim-on-libreelec/"><![CDATA[<p>I recently bought a brand new Raspberry Pi 4, and wanted to try Kodi on it.
There is only one Kodi-distribution which has more or less decent support for RPi 4 at the moment, and that’s LibreElec (although still Alpha).</p>

<p>Since the RPi 4 is famously overheating and throttling without a fan or at least a heatsink, I got a PiMoroni Fan Shim. Nice piece of hardware, but their library cannot run on LibreElec, because they do not support installing python libraries through pip etc… On LibreElec, the whole rootfs is a read-only squashfs image.</p>

<p>So there’s no way you can install the Pimoroni python library on LibreElec, but I found an alternative:
I found Phil Randal’s blog at <a href="http://www.philrandal.co.uk/blog/archives/2019/07/entry_214.html">http://www.philrandal.co.uk/blog/archives/2019/07/entry_214.html</a>,
where he described how to get at least the Fan portion of the Fan Shim working on LibreElec.</p>

<p>I decided to build on that, and port the LED functionality to LibreElec as well, without the need for “pip install” or anything not supported.</p>

<p>First, you need to install the Raspberry Pi Tools addon in LibreElec.</p>
<ol>
  <li>Addons</li>
  <li>Install from repository</li>
  <li>Libreelec add-ons</li>
  <li>Program add-ons</li>
  <li>Raspberry Pi Tools.
Then, use these script below to have Fan + LED control on your LibreElec RPi4.</li>
</ol>

<p>Save it as /storage/fanshim.py and make executable: <br />
<code class="language-plaintext highlighter-rouge">$ chmod +x /storage/fanshim.py</code></p>

<p>Then edit /storage/.config/autostart.sh so it contains the line: <br />
<code class="language-plaintext highlighter-rouge">nohup /storage/fanshim.py &amp;</code></p>

<p>Reboot your Pi 4 for it to take effect.</p>

<p>You can find the code here:
<a href="https://gist.github.com/maximevince/2257338ea8f97dfdea7dd91656443352">https://gist.github.com/maximevince/2257338ea8f97dfdea7dd91656443352</a></p>

<div class="language-python highlighter-rouge"><div class="highlight"><pre class="highlight"><code><span class="c1">#!/usr/bin/env python
#
# place command below in /storage/.config/autostart.sh
#   nohup /storage/fanshim.py &amp;
#
# By Maxime Vincent (maxime [dot] vince [at] gmail [dot] com)
#
# Based on:
# http://www.philrandal.co.uk/blog/archives/2019/07/entry_214.html
# https://forum-raspberrypi.de/forum/thread/43568-fan-shim-steuern/
# and:
# https://github.com/pimoroni/fanshim-python/blob/master/examples/automatic.py
#
</span><span class="kn">import</span> <span class="nn">atexit</span>
<span class="kn">import</span> <span class="nn">colorsys</span>
<span class="kn">import</span> <span class="nn">argparse</span>
<span class="kn">import</span> <span class="nn">time</span>
<span class="kn">import</span> <span class="nn">sys</span>
<span class="kn">import</span> <span class="nn">subprocess</span>

<span class="n">sys</span><span class="p">.</span><span class="n">path</span><span class="p">.</span><span class="n">append</span><span class="p">(</span><span class="s">'/storage/.kodi/addons/virtual.rpi-tools/lib'</span><span class="p">)</span>
<span class="kn">import</span> <span class="nn">RPi.GPIO</span> <span class="k">as</span> <span class="n">GPIO</span>

<span class="n">FAN</span> <span class="o">=</span> <span class="mi">18</span>
<span class="n">DAT</span> <span class="o">=</span> <span class="mi">15</span>
<span class="n">CLK</span> <span class="o">=</span> <span class="mi">14</span>
<span class="n">PIXELS_PER_LIGHT</span> <span class="o">=</span> <span class="mi">4</span>
<span class="n">DEFAULT_BRIGHTNESS</span> <span class="o">=</span> <span class="mi">3</span>
<span class="n">MAX_BRIGHTNESS</span> <span class="o">=</span> <span class="mi">3</span>

<span class="n">pixels</span> <span class="o">=</span> <span class="p">[[</span><span class="mi">0</span><span class="p">,</span> <span class="mi">0</span><span class="p">,</span> <span class="mi">0</span><span class="p">,</span> <span class="n">DEFAULT_BRIGHTNESS</span><span class="p">]]</span> <span class="o">*</span> <span class="n">PIXELS_PER_LIGHT</span>
<span class="n">fan_enabled</span> <span class="o">=</span> <span class="bp">False</span>

<span class="n">parser</span> <span class="o">=</span> <span class="n">argparse</span><span class="p">.</span><span class="n">ArgumentParser</span><span class="p">()</span>
<span class="n">parser</span><span class="p">.</span><span class="n">add_argument</span><span class="p">(</span><span class="s">'--off-threshold'</span><span class="p">,</span> <span class="nb">type</span><span class="o">=</span><span class="nb">float</span><span class="p">,</span> <span class="n">default</span><span class="o">=</span><span class="mf">55.0</span><span class="p">,</span> <span class="n">help</span><span class="o">=</span><span class="s">'Temperature threshold in degrees C to enable fan'</span><span class="p">)</span>
<span class="n">parser</span><span class="p">.</span><span class="n">add_argument</span><span class="p">(</span><span class="s">'--on-threshold'</span><span class="p">,</span> <span class="nb">type</span><span class="o">=</span><span class="nb">float</span><span class="p">,</span> <span class="n">default</span><span class="o">=</span><span class="mf">65.0</span><span class="p">,</span> <span class="n">help</span><span class="o">=</span><span class="s">'Temperature threshold in degrees C to disable fan'</span><span class="p">)</span>
<span class="n">parser</span><span class="p">.</span><span class="n">add_argument</span><span class="p">(</span><span class="s">'--delay'</span><span class="p">,</span> <span class="nb">type</span><span class="o">=</span><span class="nb">float</span><span class="p">,</span> <span class="n">default</span><span class="o">=</span><span class="mf">2.0</span><span class="p">,</span> <span class="n">help</span><span class="o">=</span><span class="s">'Delay, in seconds, between temperature readings'</span><span class="p">)</span>
<span class="n">parser</span><span class="p">.</span><span class="n">add_argument</span><span class="p">(</span><span class="s">'--verbose'</span><span class="p">,</span> <span class="n">action</span><span class="o">=</span><span class="s">'store_true'</span><span class="p">,</span> <span class="n">default</span><span class="o">=</span><span class="bp">False</span><span class="p">,</span> <span class="n">help</span><span class="o">=</span><span class="s">'Output temp and fan status messages'</span><span class="p">)</span>
<span class="n">parser</span><span class="p">.</span><span class="n">add_argument</span><span class="p">(</span><span class="s">'--noled'</span><span class="p">,</span> <span class="n">action</span><span class="o">=</span><span class="s">'store_true'</span><span class="p">,</span> <span class="n">default</span><span class="o">=</span><span class="bp">False</span><span class="p">,</span> <span class="n">help</span><span class="o">=</span><span class="s">'Disable LED control'</span><span class="p">)</span>
<span class="n">parser</span><span class="p">.</span><span class="n">add_argument</span><span class="p">(</span><span class="s">'--brightness'</span><span class="p">,</span> <span class="nb">type</span><span class="o">=</span><span class="nb">float</span><span class="p">,</span> <span class="n">default</span><span class="o">=</span><span class="mf">255.0</span><span class="p">,</span> <span class="n">help</span><span class="o">=</span><span class="s">'LED brightness, from 0 to 255'</span><span class="p">)</span>

<span class="n">args</span> <span class="o">=</span> <span class="n">parser</span><span class="p">.</span><span class="n">parse_args</span><span class="p">()</span>

<span class="k">def</span> <span class="nf">init</span><span class="p">():</span>
    <span class="c1"># For FAN
</span>    <span class="n">GPIO</span><span class="p">.</span><span class="n">setwarnings</span><span class="p">(</span><span class="bp">False</span><span class="p">)</span>
    <span class="n">GPIO</span><span class="p">.</span><span class="n">setmode</span><span class="p">(</span><span class="n">GPIO</span><span class="p">.</span><span class="n">BCM</span><span class="p">)</span>
    <span class="n">GPIO</span><span class="p">.</span><span class="n">setup</span><span class="p">(</span><span class="n">FAN</span><span class="p">,</span> <span class="n">GPIO</span><span class="p">.</span><span class="n">OUT</span><span class="p">)</span>
    <span class="c1"># For LED
</span>    <span class="n">GPIO</span><span class="p">.</span><span class="n">setup</span><span class="p">(</span><span class="n">DAT</span><span class="p">,</span> <span class="n">GPIO</span><span class="p">.</span><span class="n">OUT</span><span class="p">)</span>
    <span class="n">GPIO</span><span class="p">.</span><span class="n">setup</span><span class="p">(</span><span class="n">CLK</span><span class="p">,</span> <span class="n">GPIO</span><span class="p">.</span><span class="n">OUT</span><span class="p">)</span>
    <span class="n">atexit</span><span class="p">.</span><span class="n">register</span><span class="p">(</span><span class="n">_exit</span><span class="p">)</span>
    <span class="n">set_light</span><span class="p">(</span><span class="mi">0</span><span class="p">,</span> <span class="mi">0</span><span class="p">,</span> <span class="mi">0</span><span class="p">)</span>
    <span class="k">return</span><span class="p">()</span>

<span class="k">def</span> <span class="nf">set_pixel</span><span class="p">(</span><span class="n">x</span><span class="p">,</span> <span class="n">r</span><span class="p">,</span> <span class="n">g</span><span class="p">,</span> <span class="n">b</span><span class="p">,</span> <span class="n">brightness</span><span class="o">=</span><span class="bp">None</span><span class="p">):</span>
    <span class="s">"""Set the RGB value, and optionally brightness, of a single pixel.

    If you don't supply a brightness value, the last value will be kept.

    :param x: The horizontal position of the pixel: 0 to 7
    :param r: Amount of red: 0 to 255
    :param g: Amount of green: 0 to 255
    :param b: Amount of blue: 0 to 255
    :param brightness: Brightness: 0.0 to 1.0 (default around 0.2)

    """</span>
    <span class="k">if</span> <span class="n">brightness</span> <span class="ow">is</span> <span class="bp">None</span><span class="p">:</span>
        <span class="n">brightness</span> <span class="o">=</span> <span class="n">pixels</span><span class="p">[</span><span class="n">x</span><span class="p">][</span><span class="mi">3</span><span class="p">]</span>
    <span class="k">else</span><span class="p">:</span>
        <span class="n">brightness</span> <span class="o">=</span> <span class="nb">int</span><span class="p">(</span><span class="nb">float</span><span class="p">(</span><span class="n">MAX_BRIGHTNESS</span><span class="p">)</span> <span class="o">*</span> <span class="n">brightness</span><span class="p">)</span> <span class="o">&amp;</span> <span class="mb">0b11111</span>

    <span class="n">pixels</span><span class="p">[</span><span class="n">x</span><span class="p">]</span> <span class="o">=</span> <span class="p">[</span><span class="nb">int</span><span class="p">(</span><span class="n">r</span><span class="p">)</span> <span class="o">&amp;</span> <span class="mh">0xff</span><span class="p">,</span> <span class="nb">int</span><span class="p">(</span><span class="n">g</span><span class="p">)</span> <span class="o">&amp;</span> <span class="mh">0xff</span><span class="p">,</span> <span class="nb">int</span><span class="p">(</span><span class="n">b</span><span class="p">)</span> <span class="o">&amp;</span> <span class="mh">0xff</span><span class="p">,</span> <span class="n">brightness</span><span class="p">]</span>


<span class="k">def</span> <span class="nf">set_light</span><span class="p">(</span><span class="n">r</span><span class="p">,</span> <span class="n">g</span><span class="p">,</span> <span class="n">b</span><span class="p">):</span>
    <span class="s">"""Set the RGB colour of an individual light in your Plasma chain.

    This will set all four LEDs on the Plasma light to the same colour.

    :param r: Amount of red: 0 to 255
    :param g: Amount of green: 0 to 255
    :param b: Amount of blue: 0 to 255

    """</span>
    <span class="k">for</span> <span class="n">x</span> <span class="ow">in</span> <span class="nb">range</span><span class="p">(</span><span class="mi">4</span><span class="p">):</span>
        <span class="n">set_pixel</span><span class="p">(</span><span class="n">x</span><span class="p">,</span> <span class="n">r</span><span class="p">,</span> <span class="n">g</span><span class="p">,</span> <span class="n">b</span><span class="p">)</span>

    <span class="s">"""Output the buffer """</span>
    <span class="n">_sof</span><span class="p">()</span>

    <span class="k">for</span> <span class="n">pixel</span> <span class="ow">in</span> <span class="n">pixels</span><span class="p">:</span>
        <span class="n">r</span><span class="p">,</span> <span class="n">g</span><span class="p">,</span> <span class="n">b</span><span class="p">,</span> <span class="n">brightness</span> <span class="o">=</span> <span class="n">pixel</span>
        <span class="n">_write_byte</span><span class="p">(</span><span class="mb">0b11100000</span> <span class="o">|</span> <span class="n">brightness</span><span class="p">)</span>
        <span class="n">_write_byte</span><span class="p">(</span><span class="n">b</span><span class="p">)</span>
        <span class="n">_write_byte</span><span class="p">(</span><span class="n">g</span><span class="p">)</span>
        <span class="n">_write_byte</span><span class="p">(</span><span class="n">r</span><span class="p">)</span>

    <span class="n">_eof</span><span class="p">()</span>


<span class="c1"># Emit exactly enough clock pulses to latch the small dark die APA102s which are weird
# for some reason it takes 36 clocks, the other IC takes just 4 (number of pixels/2)
</span><span class="k">def</span> <span class="nf">_eof</span><span class="p">():</span>
    <span class="n">GPIO</span><span class="p">.</span><span class="n">output</span><span class="p">(</span><span class="n">DAT</span><span class="p">,</span> <span class="mi">0</span><span class="p">)</span>
    <span class="k">for</span> <span class="n">x</span> <span class="ow">in</span> <span class="nb">range</span><span class="p">(</span><span class="mi">36</span><span class="p">):</span>
        <span class="n">GPIO</span><span class="p">.</span><span class="n">output</span><span class="p">(</span><span class="n">CLK</span><span class="p">,</span> <span class="mi">1</span><span class="p">)</span>
        <span class="n">time</span><span class="p">.</span><span class="n">sleep</span><span class="p">(</span><span class="mf">0.0000005</span><span class="p">)</span>
        <span class="n">GPIO</span><span class="p">.</span><span class="n">output</span><span class="p">(</span><span class="n">CLK</span><span class="p">,</span> <span class="mi">0</span><span class="p">)</span>
        <span class="n">time</span><span class="p">.</span><span class="n">sleep</span><span class="p">(</span><span class="mf">0.0000005</span><span class="p">)</span>

<span class="k">def</span> <span class="nf">_sof</span><span class="p">():</span>
    <span class="n">GPIO</span><span class="p">.</span><span class="n">output</span><span class="p">(</span><span class="n">DAT</span><span class="p">,</span> <span class="mi">0</span><span class="p">)</span>
    <span class="k">for</span> <span class="n">x</span> <span class="ow">in</span> <span class="nb">range</span><span class="p">(</span><span class="mi">32</span><span class="p">):</span>
        <span class="n">GPIO</span><span class="p">.</span><span class="n">output</span><span class="p">(</span><span class="n">CLK</span><span class="p">,</span> <span class="mi">1</span><span class="p">)</span>
        <span class="n">time</span><span class="p">.</span><span class="n">sleep</span><span class="p">(</span><span class="mf">0.0000005</span><span class="p">)</span>
        <span class="n">GPIO</span><span class="p">.</span><span class="n">output</span><span class="p">(</span><span class="n">CLK</span><span class="p">,</span> <span class="mi">0</span><span class="p">)</span>
        <span class="n">time</span><span class="p">.</span><span class="n">sleep</span><span class="p">(</span><span class="mf">0.0000005</span><span class="p">)</span>

<span class="k">def</span> <span class="nf">_write_byte</span><span class="p">(</span><span class="n">byte</span><span class="p">):</span>
    <span class="k">for</span> <span class="n">x</span> <span class="ow">in</span> <span class="nb">range</span><span class="p">(</span><span class="mi">8</span><span class="p">):</span>
        <span class="n">GPIO</span><span class="p">.</span><span class="n">output</span><span class="p">(</span><span class="n">DAT</span><span class="p">,</span> <span class="n">byte</span> <span class="o">&amp;</span> <span class="mb">0b10000000</span><span class="p">)</span>
        <span class="n">GPIO</span><span class="p">.</span><span class="n">output</span><span class="p">(</span><span class="n">CLK</span><span class="p">,</span> <span class="mi">1</span><span class="p">)</span>
        <span class="n">time</span><span class="p">.</span><span class="n">sleep</span><span class="p">(</span><span class="mf">0.0000005</span><span class="p">)</span>
        <span class="n">byte</span> <span class="o">&lt;&lt;=</span> <span class="mi">1</span>
        <span class="n">GPIO</span><span class="p">.</span><span class="n">output</span><span class="p">(</span><span class="n">CLK</span><span class="p">,</span> <span class="mi">0</span><span class="p">)</span>
        <span class="n">time</span><span class="p">.</span><span class="n">sleep</span><span class="p">(</span><span class="mf">0.0000005</span><span class="p">)</span>

<span class="k">def</span> <span class="nf">_exit</span><span class="p">():</span>
    <span class="n">set_light</span><span class="p">(</span><span class="mi">0</span><span class="p">,</span> <span class="mi">0</span><span class="p">,</span> <span class="mi">0</span><span class="p">)</span>
    <span class="n">GPIO</span><span class="p">.</span><span class="n">cleanup</span><span class="p">()</span>

<span class="k">def</span> <span class="nf">set_fan</span><span class="p">(</span><span class="n">status</span><span class="p">):</span>
    <span class="k">global</span> <span class="n">fan_enabled</span>
    <span class="n">changed</span> <span class="o">=</span> <span class="bp">False</span>
    <span class="k">if</span> <span class="n">status</span> <span class="o">!=</span> <span class="n">fan_enabled</span><span class="p">:</span>
        <span class="n">changed</span> <span class="o">=</span> <span class="bp">True</span>
	<span class="n">GPIO</span><span class="p">.</span><span class="n">output</span><span class="p">(</span><span class="n">FAN</span><span class="p">,</span> <span class="n">status</span><span class="p">)</span>
    <span class="n">fan_enabled</span> <span class="o">=</span> <span class="n">status</span>
    <span class="k">return</span> <span class="n">changed</span>

<span class="k">def</span> <span class="nf">watch_temp</span><span class="p">():</span>
    <span class="k">global</span> <span class="n">fan_enabled</span>
    <span class="n">cpu_temp</span> <span class="o">=</span> <span class="n">get_cpu_temp</span><span class="p">()</span>
    <span class="k">if</span> <span class="n">fan_enabled</span> <span class="o">==</span> <span class="bp">False</span> <span class="ow">and</span> <span class="n">cpu_temp</span> <span class="o">&gt;=</span> <span class="n">args</span><span class="p">.</span><span class="n">on_threshold</span><span class="p">:</span>
	<span class="k">print</span><span class="p">(</span><span class="s">"Enabling fan!"</span><span class="p">)</span>
        <span class="n">set_fan</span><span class="p">(</span><span class="bp">True</span><span class="p">)</span>
    <span class="k">if</span> <span class="n">fan_enabled</span> <span class="o">==</span> <span class="bp">True</span> <span class="ow">and</span> <span class="n">cpu_temp</span> <span class="o">&lt;=</span> <span class="n">args</span><span class="p">.</span><span class="n">off_threshold</span><span class="p">:</span>
	<span class="k">print</span><span class="p">(</span><span class="s">"Disabling fan!"</span><span class="p">)</span>
        <span class="n">set_fan</span><span class="p">(</span><span class="bp">False</span><span class="p">)</span>
    <span class="k">return</span><span class="p">();</span>

<span class="k">def</span> <span class="nf">get_cpu_temp</span><span class="p">():</span>
    <span class="k">return</span> <span class="nb">float</span><span class="p">(</span><span class="n">subprocess</span><span class="p">.</span><span class="n">check_output</span><span class="p">([</span><span class="s">'vcgencmd'</span><span class="p">,</span> <span class="s">'measure_temp'</span><span class="p">])[</span><span class="mi">5</span><span class="p">:</span><span class="o">-</span><span class="mi">3</span><span class="p">])</span>

<span class="k">def</span> <span class="nf">get_cpu_freq</span><span class="p">():</span>
    <span class="k">return</span> <span class="nb">float</span><span class="p">(</span><span class="n">subprocess</span><span class="p">.</span><span class="n">check_output</span><span class="p">([</span><span class="s">'vcgencmd'</span><span class="p">,</span> <span class="s">'measure_clock'</span><span class="p">,</span> <span class="s">'arm'</span><span class="p">])[</span><span class="mi">14</span><span class="p">:</span><span class="o">-</span><span class="mi">1</span><span class="p">])</span><span class="o">/</span><span class="mi">1000000</span>

<span class="k">def</span> <span class="nf">update_led_temperature</span><span class="p">(</span><span class="n">temp</span><span class="p">):</span>
    <span class="n">temp</span> <span class="o">-=</span> <span class="n">args</span><span class="p">.</span><span class="n">off_threshold</span>
    <span class="n">temp</span> <span class="o">/=</span> <span class="nb">float</span><span class="p">(</span><span class="n">args</span><span class="p">.</span><span class="n">on_threshold</span> <span class="o">-</span> <span class="n">args</span><span class="p">.</span><span class="n">off_threshold</span><span class="p">)</span>
    <span class="n">temp</span> <span class="o">=</span> <span class="nb">max</span><span class="p">(</span><span class="mi">0</span><span class="p">,</span> <span class="nb">min</span><span class="p">(</span><span class="mi">1</span><span class="p">,</span> <span class="n">temp</span><span class="p">))</span>
    <span class="n">temp</span> <span class="o">=</span> <span class="mf">1.0</span> <span class="o">-</span> <span class="n">temp</span>
    <span class="n">temp</span> <span class="o">*=</span> <span class="mf">120.0</span>
    <span class="n">temp</span> <span class="o">/=</span> <span class="mf">360.0</span>
    <span class="n">r</span><span class="p">,</span> <span class="n">g</span><span class="p">,</span> <span class="n">b</span> <span class="o">=</span> <span class="p">[</span><span class="nb">int</span><span class="p">(</span><span class="n">c</span> <span class="o">*</span> <span class="mf">255.0</span><span class="p">)</span> <span class="k">for</span> <span class="n">c</span> <span class="ow">in</span> <span class="n">colorsys</span><span class="p">.</span><span class="n">hsv_to_rgb</span><span class="p">(</span><span class="n">temp</span><span class="p">,</span> <span class="mf">1.0</span><span class="p">,</span> <span class="n">args</span><span class="p">.</span><span class="n">brightness</span> <span class="o">/</span> <span class="mf">255.0</span><span class="p">)]</span>
    <span class="n">set_light</span><span class="p">(</span><span class="n">r</span><span class="p">,</span> <span class="n">g</span><span class="p">,</span> <span class="n">b</span><span class="p">)</span>

<span class="k">try</span><span class="p">:</span>
    <span class="n">init</span><span class="p">()</span>
    <span class="k">while</span> <span class="bp">True</span><span class="p">:</span>
        <span class="n">t</span> <span class="o">=</span> <span class="n">get_cpu_temp</span><span class="p">()</span>
        <span class="n">f</span> <span class="o">=</span> <span class="n">get_cpu_freq</span><span class="p">()</span>

        <span class="k">if</span> <span class="n">args</span><span class="p">.</span><span class="n">verbose</span><span class="p">:</span>
            <span class="k">print</span><span class="p">(</span><span class="s">"Current: {:05.02f} Target: {:05.02f} Freq {: 5.02f} On: {}"</span><span class="p">.</span><span class="nb">format</span><span class="p">(</span><span class="n">t</span><span class="p">,</span> <span class="n">args</span><span class="p">.</span><span class="n">off_threshold</span><span class="p">,</span> <span class="n">f</span><span class="p">,</span> <span class="n">fan_enabled</span><span class="p">))</span>

        <span class="n">watch_temp</span><span class="p">()</span>

        <span class="k">if</span> <span class="ow">not</span> <span class="n">args</span><span class="p">.</span><span class="n">noled</span><span class="p">:</span>
            <span class="n">update_led_temperature</span><span class="p">(</span><span class="n">t</span><span class="p">)</span>

        <span class="n">time</span><span class="p">.</span><span class="n">sleep</span><span class="p">(</span><span class="n">args</span><span class="p">.</span><span class="n">delay</span><span class="p">)</span>

<span class="k">except</span> <span class="nb">KeyboardInterrupt</span><span class="p">:</span>
    <span class="k">pass</span>
</code></pre></div></div>

<p>Enjoy!</p>]]></content><author><name>Maxime Vincent</name></author><category term="Blog" /><category term="raspberrypi" /><category term="libreelec" /><category term="opensource" /><summary type="html"><![CDATA[I recently bought a brand new Raspberry Pi 4, and wanted to try Kodi on it. There is only one Kodi-distribution which has more or less decent support for RPi 4 at the moment, and that’s LibreElec (although still Alpha).]]></summary></entry><entry><title type="html">Nice Spectrum Analyser… but does it run DOOM?</title><link href="http://www.veemax.be/blog/DOOM-on-spectrum-analyser/" rel="alternate" type="text/html" title="Nice Spectrum Analyser… but does it run DOOM?" /><published>2017-12-02T00:00:00+01:00</published><updated>2017-12-02T00:00:00+01:00</updated><id>http://www.veemax.be/blog/DOOM-on-spectrum-analyser</id><content type="html" xml:base="http://www.veemax.be/blog/DOOM-on-spectrum-analyser/"><![CDATA[<p>There’s been quite some talk about the excellent Siglent SS 3021X Spectrum Analyser. It’s a great piece of entry-level hardware, especially for the pricepoint.
See:</p>
<ul>
  <li><a href="https://www.siglent.eu/siglent-ssa3021x-spectrum-analyser.html">https://www.siglent.eu/siglent-ssa3021x-spectrum-analyser.html</a></li>
  <li>and: EEVblog’s review/comparison: <a href="https://www.youtube.com/watch?v=gkLciTsjGZg">https://www.youtube.com/watch?v=gkLciTsjGZg</a></li>
</ul>

<p>It’s also quite hackable:
<a href="https://iw0ffk.wordpress.com/2017/01/29/hacking-the-spectrum-analyzer-siglent-ssa-3021x/">https://iw0ffk.wordpress.com/2017/01/29/hacking-the-spectrum-analyzer-siglent-ssa-3021x/</a></p>

<p>You can login over telnet using: <code class="language-plaintext highlighter-rouge">root/ding1234</code> as login/password.</p>

<p><code class="language-plaintext highlighter-rouge">dmesg</code>, <code class="language-plaintext highlighter-rouge">cat /proc/cpuinfo</code> and friends tell a lot about this device.
It seems it’s based on an am335x chipset from TI.
http://www.ti.com/processors/sitara/arm-cortex-a8/am335x/overview.html</p>

<p>The framebuffer is accesible throught /dev/fb0</p>

<p>Mmm.. let’s run DOOM on this thing!</p>

<p>Fetch the same toolchain Siglent used to compile software for this spectrum analyser:
https://releases.linaro.org/archive/13.03/components/toolchain/binaries/</p>

<p>Compile my minimal DOOM fork meant for easy porting to framebuffers:</p>
<div class="language-plaintext highlighter-rouge"><div class="highlight"><pre class="highlight"><code>$ git clone https://github.com/maximevince/fbDOOM
$ cd fbDOOM/fbdoom
$ make CROSS_COMPILE=arm-linux-gnueabi-hf-
</code></pre></div></div>

<p>Copy fbdoom over to the Siglent (e.g. using USB stick, or busybox wget, first crosscompile dropbear, …)</p>

<p>Play!
Only auto-playing demo for now, I haven’t actually implemented any of the input controls (no keyboard or mouse)</p>

<p>Some footage here:
<a href="https://www.youtube.com/watch?v=ztVI7r7C-1w">https://www.youtube.com/watch?v=ztVI7r7C-1w</a></p>]]></content><author><name>Maxime Vincent</name></author><category term="Blog" /><category term="doom" /><category term="siglent" /><category term="spectrumanalyser" /><category term="opensource" /><summary type="html"><![CDATA[There’s been quite some talk about the excellent Siglent SS 3021X Spectrum Analyser. It’s a great piece of entry-level hardware, especially for the pricepoint. See: https://www.siglent.eu/siglent-ssa3021x-spectrum-analyser.html and: EEVblog’s review/comparison: https://www.youtube.com/watch?v=gkLciTsjGZg]]></summary></entry><entry><title type="html">Getting backports to work with recent linux kernel releases</title><link href="http://www.veemax.be/blog/getting-backports-to-work-with-recent-linux-kernels/" rel="alternate" type="text/html" title="Getting backports to work with recent linux kernel releases" /><published>2017-05-03T00:00:00+02:00</published><updated>2017-05-03T00:00:00+02:00</updated><id>http://www.veemax.be/blog/getting-backports-to-work-with-recent-linux-kernels</id><content type="html" xml:base="http://www.veemax.be/blog/getting-backports-to-work-with-recent-linux-kernels/"><![CDATA[<p>I have been struggling a few days now to get the fantastic “backports” project up and running on my machine (Arch Linux). Here’s what I had to do:</p>

<p>First,
make sure you have backport checkout out, and pulled in all the required trees:</p>

<div class="language-sh highlighter-rouge"><div class="highlight"><pre class="highlight"><code>git clone git://git.kernel.org/pub/scm/linux/kernel/git/backports/backports.git
<span class="nb">cd </span>backports
./devel/backports-update-manager 
</code></pre></div></div>

<p>Here’s what I found out:</p>

<ul>
  <li>Make sure your PYTHON_PATH does not contain funny stuff</li>
  <li>devel/pycocci expects Python 2. Arch Linux defaults to Python 3. Use a virtualenv2, or change devel/pycocci’s first line to “#!/usr/bin/env python2”</li>
  <li>devel/pycocci crashes randomly when using different threads. I have hacked the script to make it single-threaded. EDIT: This seems to be because of Coccinelle 1.0.6. It does not occur using Cocinnele 1.0.4</li>
  <li>Coccinelle 1.0.6 does not work with all patches included in backports, you need version 1.0.4 with python support. (bin can be found here: http://coccinelle.lip6.fr/distrib/coccinelle-1.0.4-bin-x86-python.tgz)</li>
</ul>

<p>After this, I was able to reproduce the latest release official backports release “backports-20160324”.</p>

<p>Steps:</p>
<div class="language-sh highlighter-rouge"><div class="highlight"><pre class="highlight"><code><span class="nb">cd</span> /path/to/coccinelle-1.0.4
<span class="nb">ln</span> <span class="nt">-s</span> spatch.opt spatch
<span class="nb">source </span>env.sh
<span class="nb">cd</span> ~/linux-next-history
git checkout next-20160324
<span class="nb">cd</span> ~/backports
git checkout backports-20160324
./gentree.py <span class="nt">--verbose</span> <span class="nt">--clean</span> ~/linux-next-history ~/backports/release
</code></pre></div></div>

<p>Next step is to move to more recent linux-next / wireless-testing revisions:</p>

<p>Using wireless-next, instead of linux-next, I have now successfully built a backports release using following git revisions:
backports: <code class="language-plaintext highlighter-rouge">e8ec27f6c9c5554afa00d55b663d81e0b0cebaed</code>
wireless-testing: wt-2017-04-24 (<code class="language-plaintext highlighter-rouge">2f0e53b3d84bfb1af171ad8e556875f3bcb6caa2</code>)</p>

<div class="language-sh highlighter-rouge"><div class="highlight"><pre class="highlight"><code>./gentree.py <span class="nt">--verbose</span> <span class="nt">--clean</span> ~/wireless-testing ~/backports/backports-wt-20170424
</code></pre></div></div>

<p>Happy backporting!</p>]]></content><author><name>Maxime Vincent</name></author><category term="Blog" /><category term="backports" /><category term="linux" /><category term="opensource" /><category term="coccinelle" /><category term="kernel" /><summary type="html"><![CDATA[I have been struggling a few days now to get the fantastic “backports” project up and running on my machine (Arch Linux). Here’s what I had to do:]]></summary></entry><entry><title type="html">Lock-ups and freezes w/ an STM32F4Discovery board with ST-Link v2, OpenOCD and GDB</title><link href="http://www.veemax.be/blog/lockups-and-freezes-with-stm32f4discovery/" rel="alternate" type="text/html" title="Lock-ups and freezes w/ an STM32F4Discovery board with ST-Link v2, OpenOCD and GDB" /><published>2013-09-01T00:00:00+02:00</published><updated>2013-09-01T00:00:00+02:00</updated><id>http://www.veemax.be/blog/lockups-and-freezes-with-stm32f4discovery</id><content type="html" xml:base="http://www.veemax.be/blog/lockups-and-freezes-with-stm32f4discovery/"><![CDATA[<p>This post is especially an outing of my joy now that I have finally resolved my issue debugging the STM32F4xx using OpenOcd.</p>

<p>There exist many blogpost, tutorials, manuals about setting up an STM32F4Discovery + OpenOcd + gdb combo.
I won’t explain how to do it here, but it is an awesome, powerful and very cheap set-up.</p>

<p>I chose the STM32F4Discovery board as the demo board for my course on embedded C, because it’s cheap, full of features and has on-board debugging hardware.</p>

<p>Writing a custom crt0, I ran into problems however. Stepping through the early init code, assembly instruction per assembly instruction, gdb would just lock-up, freeze, at random moments. Not always on the same instruction, not always at the same moment. I could also set a breakpoint on a certain line, then type ‘c’ to continue, and the debugger would never break, or even respond to a Ctrl+C.</p>

<p>Furthermore, using st-util, from the texane github (https://github.com/texane/stlink) would work.It’s awefully slow (especially when using the split layout in gdb-tui, that disassbles on-the-fly)</p>

<p>Digging up a mailinglist message from about a year ago (http://www.mail-archive.com/openocd-devel@lists.sourceforge.net/msg01605.html) I finally found the solution to the problem.</p>

<p>The STM32F4 features a <code class="language-plaintext highlighter-rouge">DBGMCU</code> register,
which by default will leave the debug function of the mcu in an unpowered state when in standby, stop or sleep mode.</p>

<p>Changed my openocd.cfg file to:</p>
<div class="language-plaintext highlighter-rouge"><div class="highlight"><pre class="highlight"><code> #Include configs from openocd  
 source [find board/stm32f4discovery.cfg]  
 source [find mem_helper.tcl]  
 # Disable power-saving for debug circuitry  
 $_TARGETNAME configure -event reset-init {  
   # allow debugging during sleep/stop/standby modes:  
   # set DBG_SLEEP, DBG_STOP and DBG_STANDBY bits in DBGMCU_CR  
   mmw 0xe0042004 0x7 0x0  
 }  
</code></pre></div></div>

<p>Then, additionally, it is very important to reset the board in a clean way.
For this, issue a “monitor reset halt” command. I automated it by adding it to my <code class="language-plaintext highlighter-rouge">.gdbinit</code> file:</p>
<div class="language-plaintext highlighter-rouge"><div class="highlight"><pre class="highlight"><code> tar ext :3333
 monitor halt
 file out/main.elf
 load out/main.elf
 monitor reset halt
 stepi
</code></pre></div></div>
<p>This config will make gdb(tui) automatically connect to openocd, then stop the cpu, flash the ELF file, load symbols from the elf file, reset the mcu in a clean way and then step to the first instruction to be executed.
This leaved the cpu halted, at the first assembly instruction. From there, you can set-up breakpoints, or just hit ‘c’ to start running.</p>

<p>Once I had taken care of both these topics, gone was my trouble!</p>

<p>Happy debugging!</p>]]></content><author><name>Maxime Vincent</name></author><category term="Blog" /><category term="debugging" /><category term="openocd" /><category term="opensource" /><category term="gdb" /><category term="stm32" /><summary type="html"><![CDATA[This post is especially an outing of my joy now that I have finally resolved my issue debugging the STM32F4xx using OpenOcd.]]></summary></entry><entry><title type="html">picoTCP: A free TCP/IP stack for embedded systems</title><link href="http://www.veemax.be/blog/a-free-tcpip-stack-for-embedded-systems/" rel="alternate" type="text/html" title="picoTCP: A free TCP/IP stack for embedded systems" /><published>2013-03-07T00:00:00+01:00</published><updated>2013-03-07T00:00:00+01:00</updated><id>http://www.veemax.be/blog/a-free-tcpip-stack-for-embedded-systems</id><content type="html" xml:base="http://www.veemax.be/blog/a-free-tcpip-stack-for-embedded-systems/"><![CDATA[<p>Another awesome project I’ve been busy with:</p>

<p>I’m working for a company (TASS) that is specialized in embedded systems development and consultancy, and we have been working for quite some time on the PicoTCP project.</p>

<p>This is a TCP/IP stack, with a small footprint (so very suitable for embedded systems) and a very complete feature-set.
You can check it out for yourself, since it’s free: (GPL v2, but dual-licensed should you want to use for your company)
<a href="https://github.com/tass-belgium/picotcp">https://github.com/tass-belgium/picotcp</a></p>

<p>Update: TASS/Altran seems to have abandoned the project, but it lives on as a GPL project here: <a href="https://github.com/virtualsquare/picotcp">https://github.com/virtualsquare/picotcp</a></p>

<p>We have demos of the stack running under linux with a virtual ethernet device (VDE), and on a whole bunch of development boards, such as the STM32F4 boards, a Ti Stellaris Board, a PIC24, …</p>

<p>Check it out!</p>]]></content><author><name>Maxime Vincent</name></author><category term="Blog" /><category term="link" /><category term="projects" /><category term="opensource" /><category term="tcpip" /><summary type="html"><![CDATA[Another awesome project I’ve been busy with:]]></summary></entry><entry><title type="html">GPS trackers + SMS + USB GSM Modem + Java + JavaScript + Google Maps</title><link href="http://www.veemax.be/blog/gps-trackers-sms-usb-gsm-modem/" rel="alternate" type="text/html" title="GPS trackers + SMS + USB GSM Modem + Java + JavaScript + Google Maps" /><published>2013-03-06T00:00:00+01:00</published><updated>2013-03-06T00:00:00+01:00</updated><id>http://www.veemax.be/blog/gps-trackers-sms-usb-gsm-modem</id><content type="html" xml:base="http://www.veemax.be/blog/gps-trackers-sms-usb-gsm-modem/"><![CDATA[<p>Ok,
What have I been up to lately, technically speaking?</p>

<p>Mostly, two things: The STM32F4-Discovery board which is a cheap and awesome developmentboard by STMicroelectronics boasting an ARM Cortex-M4 and an on-board JTAG-dongle so to speak: That opens a lot of interresting perspectives. But I’ll talk about that in a next blogpost.</p>

<p>The second thing is a combinations of the following technologies: GPS trackers + SMS + USB GSM Modem + Java + JavaScript + Google Maps.
The idea is to have live tracking of about 20 GPS-trackers on a Google Map. This would serve as central intelligence center in a big real-life “hunting” game we’re preparing at the moment to play with about 100 youngsters in the city of Tongeren. It will be called “Nacht van de Jacht”, for those interrested :).
The set-up I thought of was the following: We bought about 20 Chinese GPS trackers that are sending their position in an SMS to a central phone number every 3 minutes or so. These SMSes are received by an USB Modem I had lying around (Vodaphone 3g modem when I was in Australia, actually it’s a Huawei E169). A Java program should then fetch the messages from the modem, and push then to a MySQL database.
This modem has 3 virtual COM ports which allow access to the modem through AT-commands. (Great resource: http://www.developershome.com/sms/atCommandsIntro.asp). This allows fetching incoming messages through this interface. I was not going to write the whole stack, and I heard of the SMSLib project before. (http://smslib.org/) I downloaded this, together with the RXTX library allowing COM-port access from Java from Linux, OSX, Windows, BSD, … (http://rxtx.qbang.org/wiki/index.php/Main_Page) and wrote a first try-out project in NetBeans (http://netbeans.org/).
It’s been a while since i’ve used Java, or the Netbeans IDE, but I must say, I got quick results. After some debugging, adding polling to the RXTX &lt;-&gt; SMSlib interface because of the Virtual COM port, I could read SMS messages from my USB GSM Modem.
The second part is a webpage, that will query this MySQL database through PHP, formatting this into a JSON string being passed to some JavaScript running in the client’s browser. This JavaScript (Mainly jQuery (http://jquery.com/)) will then parse the JSON, and display the data on a Google Map, using the Google Maps JavaScript API (https://developers.google.com/maps/documentation/javascript/reference).</p>

<p>Right now I have written a Java app that fetches incoming SMS messages from the USB GSM Modem, and can talk to the MySQL server. I also have a webpage that parses a (fixed for now) JSON-string’s data and plots these on a Google Maps.
Next up:</p>
<ol>
  <li>Pushing the incoming messages to MySQL.</li>
  <li>Querying MySQL from PHP and passing this data in a JSON string to the JavaScript part.</li>
</ol>

<p>Not that far away any more…</p>]]></content><author><name>Maxime Vincent</name></author><category term="Blog" /><category term="gps" /><category term="modem" /><category term="tracking" /><summary type="html"><![CDATA[Ok, What have I been up to lately, technically speaking?]]></summary></entry></feed>